
- Guides
- Proxy Recipes
- API
- Form JS
- External Links
This guide will help you capture payment card data from a third party or web frontend without having the data touch your own servers.
By using uniquely generated capture endpoints you can ingest sensitive data without compromising your key or your authorization details. Capturing data this way is the most PCI compliant way of ingesting payment card data. Note: This guide will use the term "third party" to refer to third parties, your own web frontend or to any other untrusted source.
Overview
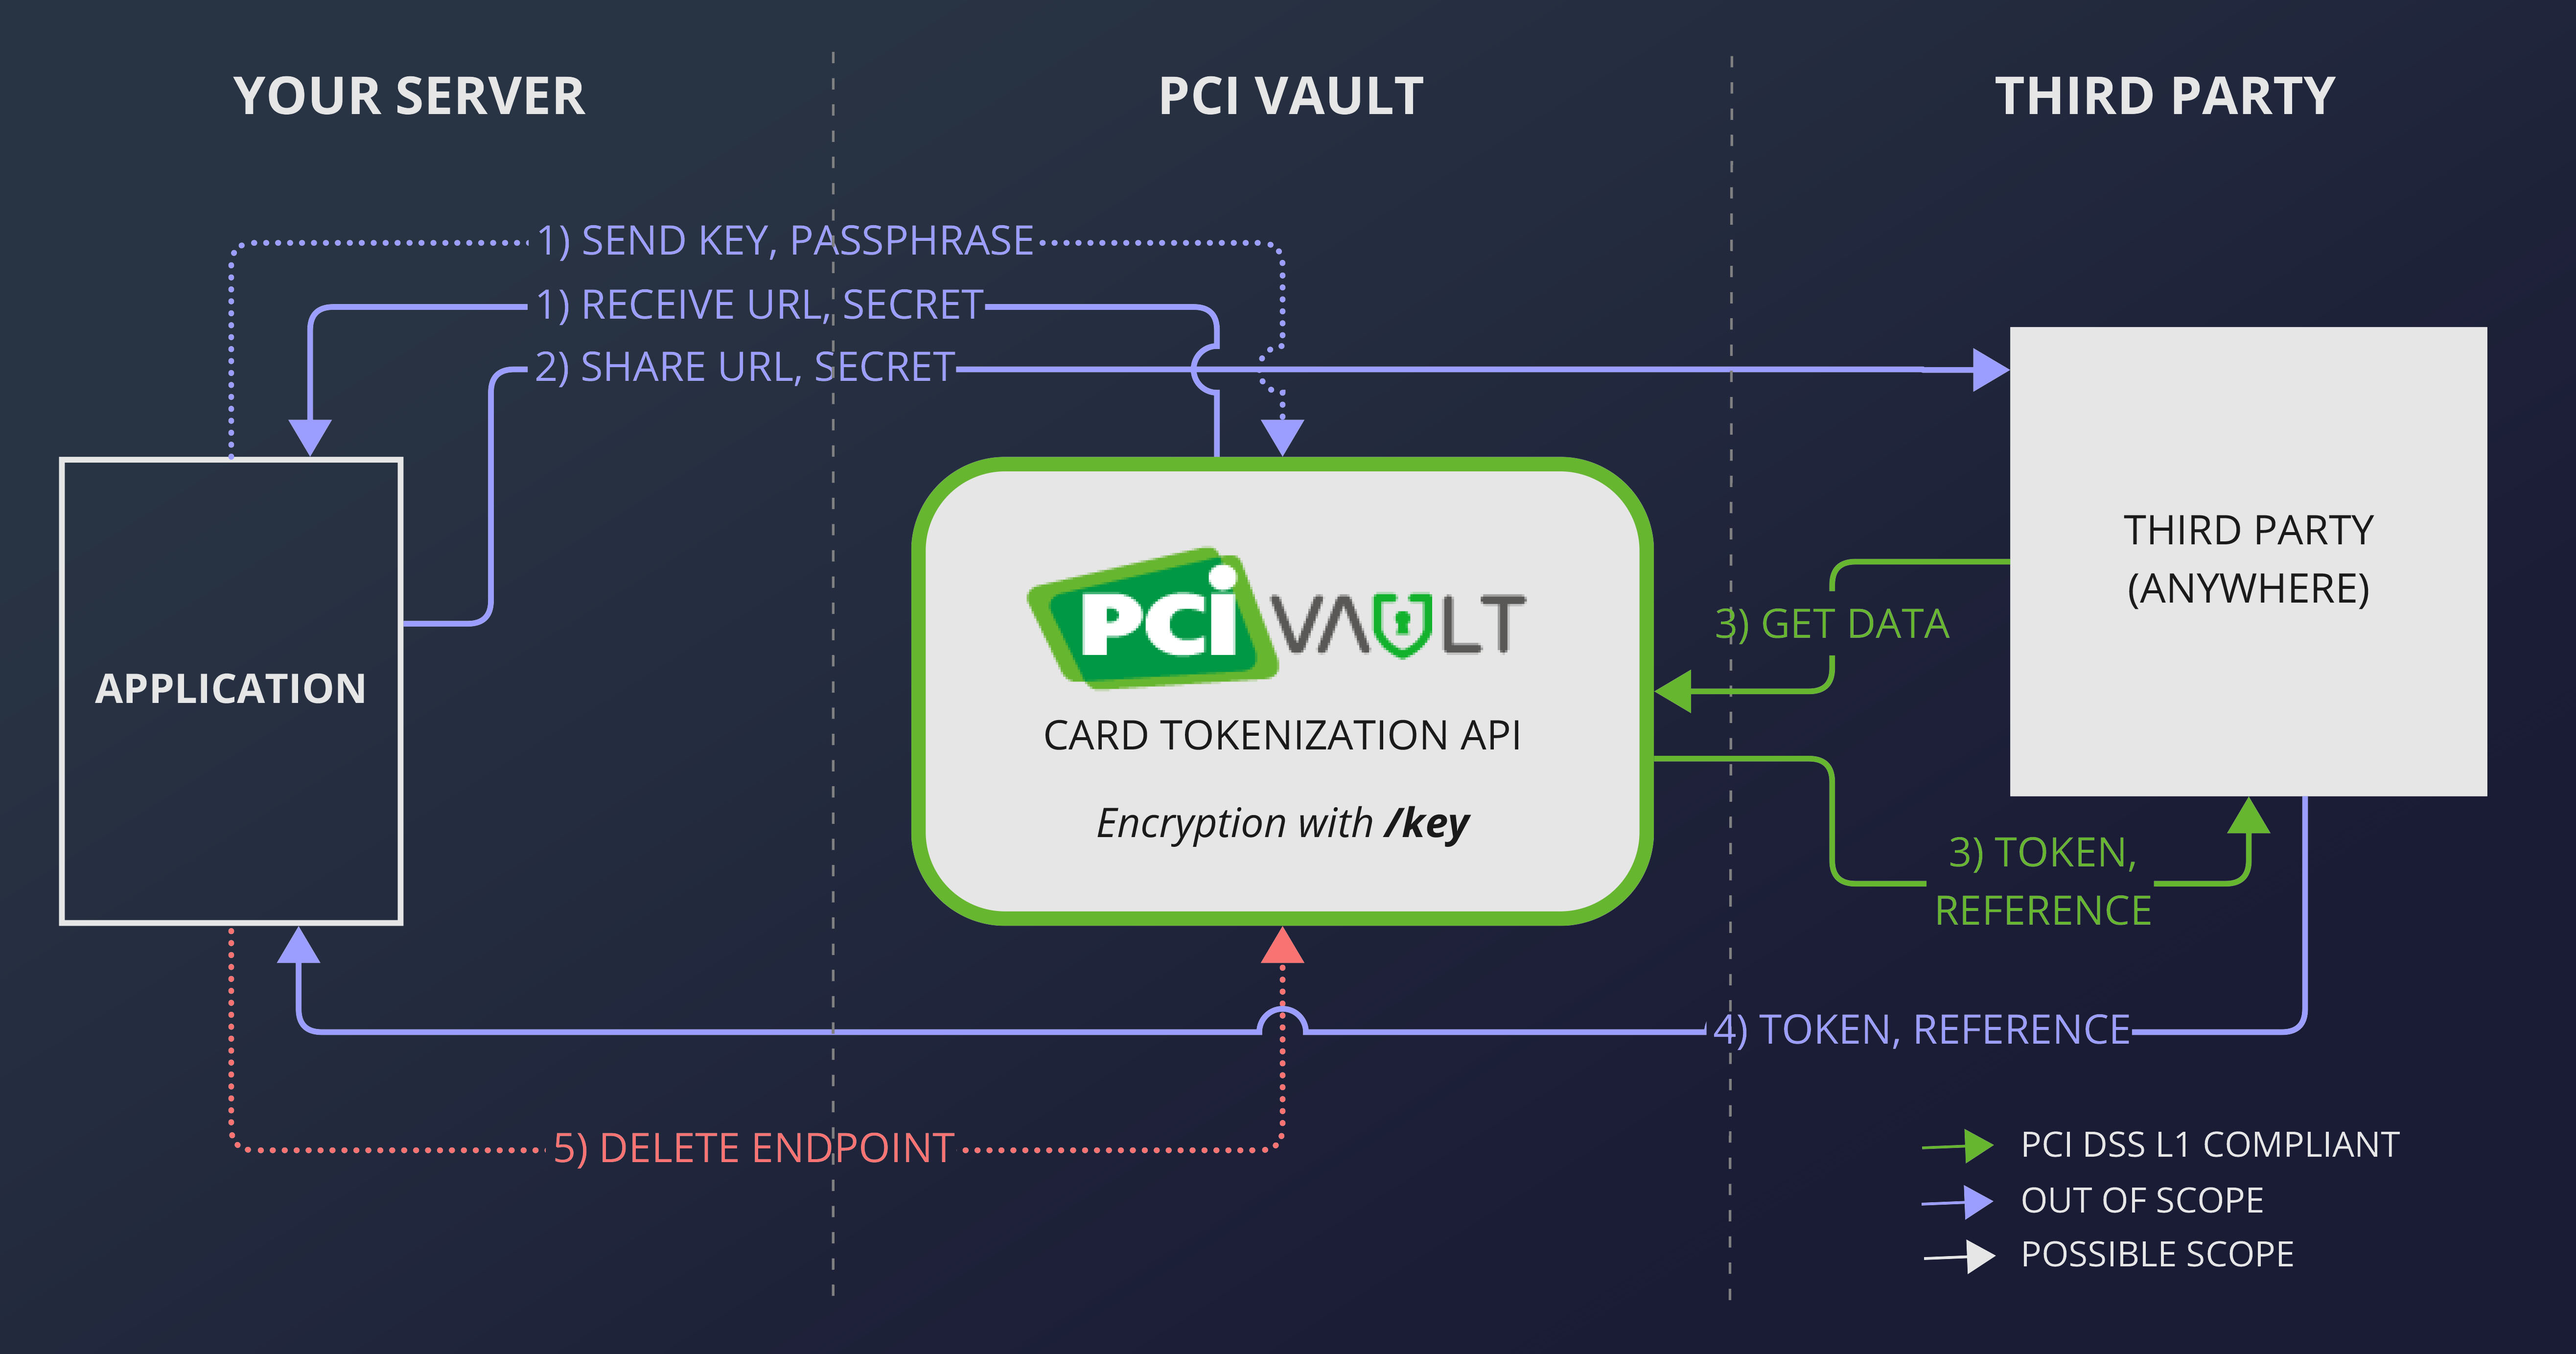
Creating and using a unique capture endpoint like this is a 5-step process of which the last 2 are optional but recommended.
- Create a unique endpoint by sending your key and passphrase to the vault.
- Send the URL and secret to the third party.
- The third party sends the data to the vault and receives a token and reference for the data.
- The third party sends the token and reference to your server.
- Delete the endpoint, so that it does not get abused.
┌───────────┐       ┌─────────┐        ┌───────────┐
│Your Server│       │PCI Vault│        │Third Party│
└─────┬─────┘       └────┬────┘        └─────┬─────┘
      │                  │                   │
      │1) Key, Passphrase│                   │
      │─────────────────>│                   │
      │                  │                   │
      │  1) URL, Secret  │                   │
      │<─────────────────│                   │
      │                  │                   │
      │            2) URL, Secret            │
      │─────────────────────────────────────>│
      │                  │                   │
      │                  │      3) Data      │
      │                  │<──────────────────│
      │                  │                   │
      │                  │3) Token, Reference│
      │                  │──────────────────>│
      │                  │                   │
      │         4) Token, Reference          │
      │<─────────────────────────────────────│
      │                  │                   │
      │5) Delete Endpoint│                   │
      │─────────────────>│                   │
┌─────┴─────┐       ┌────┴────┐        ┌─────┴─────┐
│Your Server│       │PCI Vault│        │Third Party│
└───────────┘       └─────────┘        └───────────┘
Step 1: Create a Unique Endpoint
Create an endpoint for capturing data using "Create a Capturing Endpoint".
Every capturing endpoint will be backed by an existing secret key. The user and passphrase for this key must be provided in the query string parameters. The vault will encrypt and store the provided key information as if it was a card, and return a unique id and secret which acts like a new temporary key capable of encrypting data to be decrypted by the original key.
Optionally provide your own unique id if you don't want the vault to generate a random URL. Each of these endpoints also come with a default TTL (Time To Live) of 24 hours. Control the TTL by specifying your own in the query string. To make the endpoint permanent, use a TTL value of 0 seconds.
For example, this Python code:
import requests
from requests.auth import HTTPBasicAuth

auth = HTTPBasicAuth('user', 'password')

url = "https://api.pcivault.io/v1/capture"
user = "test-user"
passphrase = "ALongAndVerySecretPassphraseThatIsSuperSecure"

res = requests.post(f'{url}?user={user}&passphrase={passphrase}&ttl=45m', auth=auth)

# do something with the response
print(res)
print(res.text)
should return a JSON object like this:
{
  "url":"/v1/capture/NjUDoEi3z8zFB33WEwSRg",
  "secret":"S2TRYkjufkfwf8oItW2G_j1HcZ1ftMvURZwZJlbzb2BylPEPo8536sqdkO6J9i3x",
  "expires_at":"2022-07-25T15:42:59Z"
}
Step 2: Send URL & Secret to Third Party
The way in which you share the URL and Secret to the third party depends on your setup. Typically, you would do this in response to an HTTPS request from the third party.
Here are some dos and don'ts:
- DO generate a new URL & Secret for every data item. The unique capturing endpoints are meant to be short-lived.
- DO be careful to whom you share the URL & Secret. Anybody with the URL & Secret can POST data on your behalf until the endpoint is deleted or expired. You will be charged for the POST as if it was a normal API request.
- DON'T make it too hard for the third party to access the URL & Secret. If you are replying to an HTTPS request, that is enough encryption. Nothing can be done with the URL & Secret except for POSTing data to the vault.
- DON'T send your basic auth details to the third party, even if the third party is your own web frontend.
- DON'T send your key or passphrase to the third party, even if the third party is your own web frontend.
If the third party is a web frontend, keep in mind that the user will have access to all data that you send. There is no effective way to protect the URL & Secret once it is on the user's browser. That is why it is a good idea to not disable expiry, and delete the endpoint after it was used.
Step 3: Third Party Stores the Data in the Vault
Using the URL & Secret,
the third party can send data to the vault to be tokenized.
The secret must be in the X-PCIVault-Capture-Secret HTTP header of the POST request.
The rest of the request works exactly the same as POSTing to the vault directly from your own server, except that the basic auth details, key, and passphrase have been replaced by the URL & Secret.
For example, you can send the data using JavaScript's fetch API:
const requestInfo = {
    method: 'POST',
    headers: {
        'X-PCIVault-Capture-Secret': 'S2TRYkjufkfwf8oItW2G_j1HcZ1ftMvURZwZJlbzb2BylPEPo8536sqdkO6J9i3x',
    },
    body: JSON.stringify({
            "card_expiry": "06-2025",
            "card_holder": "J DOE",
            "card_number": "4111 1111 1111 1111"
        }
    ),
};

fetch("https://api.pcivault.io/v1/capture/NjUDoEi3z8zFB33WEwSRg", requestInfo)
    .then((response) => {
        return response.json();
    })
    .then((response) => {
        console.debug(response);
        // do something with the response
    })
The vault will reply to the third party with the token and reference like this:
{
  "token": "96bee2420273079c0d552193b9222ae642481dac326dee08c60a95c824352359",
  "user": "test-user",
  "reference": "NjUDoEi3z8zFB33WEwSRg"
}
Note that the default reference will be the unique id of the endpoint. The third party can override this by specifying a reference in the query string.
Step 4: Third Party Sends Token and Reference to Your Server
In order to store the token and reference on your system,
the third party will have to forward it to you.
If the third party fails to send the token and reference,
you can still search for it in the vault.
To get a list of all tokens and references, invoke
GET /vault
without supplying a token or reference.
Step 5: Delete the URL & Secret
It is good practice to delete the endpoint after use to prevent bad actors from exploiting the endpoint and making the unique id available for use again. There's not much they can do, except for sending junk data, but it's still a good idea to delete the endpoint.
Do this by invoking
DELETE /capture/{unique_id}.
If the endpoint does not get deleted, the vault will clean it out some time after it expired. The unique id, however, will remain reserved until the endpoint has been deleted or cleaned.