
- Guides
- Proxy Recipes
- API
- Form JS
- External Links
This guide will help you send data to a third party without having the data touch your own servers.
PCI Vault will send the data to the third party with built-in exponential back-off,
and will return the third party's response to you via webhook if the request is asynchronous (default)
or in the response if the request is synchronous.
Overview
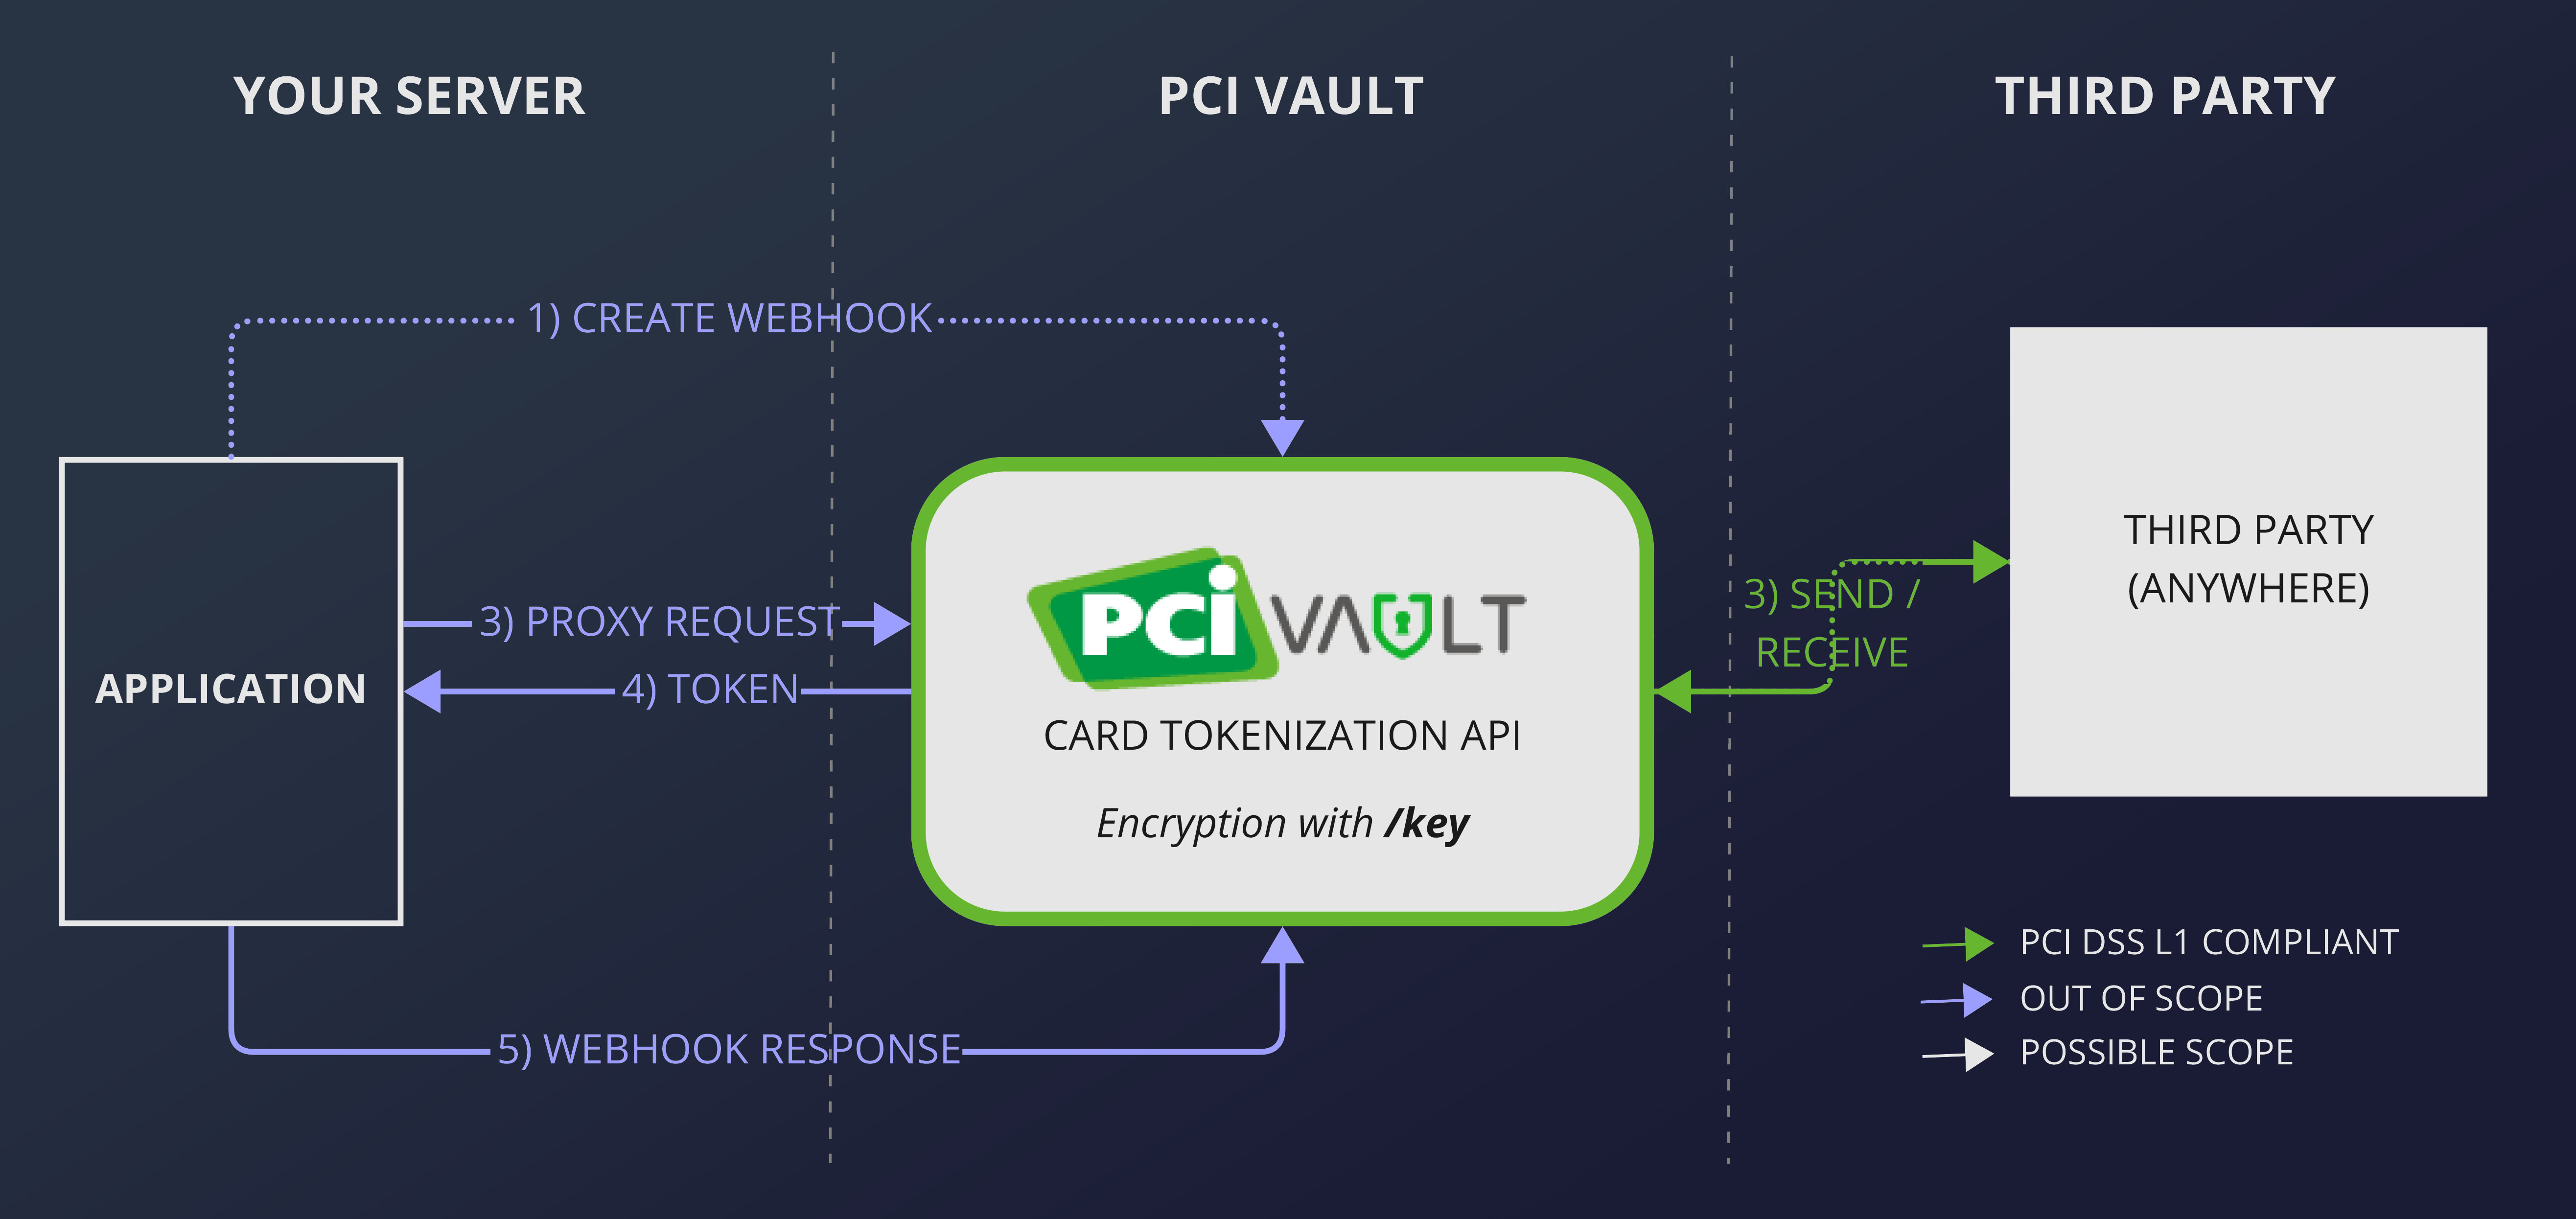
Sending data from PCI Vault is a 5-step process.
- Create a webhook endpoint on your server that is accessible from the web.
- Send a request to PCI Vault to send your card data to a third party, using a mustache template.
- PCI Vault sends a request to the third party with your data, automatically retrying on a failure.
- Receive the third party's response on the endpoint you created in step 1.
- Reply to PCI Vault after you received the webhook.
┌───────────┐             ┌─────────┐        ┌───────────┐
│Your Server│             │PCI Vault│        │Third Party│
└─────┬─────┘             └────┬────┘        └─────┬─────┘
      │                        │                   │
      │1) Create Webhook       │                   │
      │                        │                   │
      │2) Proxy Request        │                   │
      │───────────────────────>│                   │
      │                        │                   │
      │                        │3) Send & Receive  │
      │                        │<─────────────────>│
      │                        │                   │
      │4) Third Party Response │                   │
      │<───────────────────────│                   │
      │                        │                   │
      │5) Webhook Response     │                   │
      │───────────────────────>│                   │
┌─────┴─────┐             ┌────┴────┐        ┌─────┴─────┐
│Your Server│             │PCI Vault│        │Third Party│
└───────────┘             └─────────┘        └───────────┘
Step 1: Create a Webhook Endpoint
Create a webhook endpoint on your server. The webhook endpoint must be accessible from the web and use HTTPS as its protocol.
To secure the webhook endpoint against bad actors, you must protect your webhook with a secret which can be submitted in an HTTP header. You will provide this secret to PCI Vault in step 2.
You can choose to
- create a new webhook endpoint and secret for every proxy request,
- have one endpoint with a new secret on every proxy request,
- have one endpoint and secret to use with all proxy requests.
We recommend the first option and discourage the last option. All three options are allowed.
Step 2: Request Your Data to be Sent to a Third Party
Make a POST request to /proxy/post. The body of the request must contain a request template in JSON.
For example:
{
  "request": {
    "method": "POST",
    "url": "https://example-psp.com/process",
    "headers": [
      {"Content-Type": "application/json"},
      {"Authorization": "Basic ZXhhbXBsZTpwYXNzd29yZA=="}
    ],
    "body": "{\"mustache_template\": \"{{number}}\"}"
  },
  "webhook": {
    "url": "https://reply-to.me",
    "secret": "rIx9tXqTH10_ShEThqQZ2yRI0e9_aPP9"
  }
}
May POST {"mustache_template": "4111 1111 1111 1111"} to
https://example-psp.com/process with the specified headers included in the request.
The mustache template will be compiled with the data associated to the provided token.
For example:
{
   "number": "{{number}}",
   "cvv": {{cvv}},
   "expiry": "06/25"
}
May generate a request body like
{
   "number": "4111 1111 1111 1111",
   "cvv": 234,
   "expiry": "06/25"
}
PCI Vault will do the following validation before sending:
- The request URL must use HTTPS.
- The request method must be a valid HTTP method if present.
- If the webhook is present, the URL must be HTTPS and the secret must be present.
If PCI Vault responds with 200 OK, the request will be sent to the third party soon. Any other response code means that something went wrong and the request will not be sent.
Apply a Transformation Rule
(Optional)
When sending your data to a third party, it is often necessary to transform it into a different format from the one that's stored in the PCI Vault. For example, parse a string value as an integer. This can be done by creating your own custom rule and instructing PCI Vault to apply it on the data before substituting the values in the mustache template and sending it off.
Rules can be created and managed using the Rules API.
For a list of operations that can be applied to your data see the Rule Engine Guide.
Any original fields and extra fields generated by the rule can be used in a body template as in the example above. The request can also accept an extra_data object which will be merged with the original data before the rule is applied. These fields can also be used in header values and URL parameters:
{
  "request": {
    "method": "POST",
    "url": "https://example-psp.com/process?signature={{body_hash}}",
    "headers": [
      {"Content-Type": "application/json"},
      {"X-Custom-Header": "{{operation_output}}"}
    ],
    "body": "{\"mustache_template\": \"{{number}}\", \"amount\": \"{{amount}}\"}",
    "extra_data": {
      "amount": 4450
    }
    ...
  }
}
To apply a rule to your data before sending the request is simple, just specify your rule id(s) in the query ?rules=convert-ints,generate-hash. The rules will be applied in the correct order if there are more than one.
Step 3: PCI Vault Handles the Request
PCI Vault will send the request to the third party on your behalf. If the third party responds with a 429 or 5xx error, PCI Vault will retry the request with exponential backoff until it succeeds or failed a number of times.
Any response by the third party that is not in the 5xx range, will be forwarded to you via webhook.
Step 4: Handle Webhook Requests
PCI Vault will send a POST request to your webhook endpoint and include your secret
in the X-PCIVault-Webhook-Secret header.
It is your responsibility to ensure the secret in the header matches to the one you sent.
The data in the POST request will look like this:
{
   "headers": [
      {"Content-Type": "application/json"},
      {"Content-Length": "24"},
      {"X-Custom-Header": "custom-data"}
   ],
   "body": "{\"status\": \"processed\"}",
   "status": "200"
}
All headers in the third party's response is included and the response body is copied verbatim before being JSON escaped.
Step 5: Respond to the Webhook Request
Please respond with an HTTP status code in 2xx range if you successfully processed
the request.
All other status codes will cause PCI Vault to retry the webhook with exponential backoff.
Every attempt at POSTing to the webhook will be charged as a normal API operation.
Please handle the following cases accordingly:
- If no secret is present the request, please respond with
404 Not Found, or401 Unauthorized. This probably means someone else is trying to send data on the webhook. - If the secret is present but not correct, please respond with
403 Forbidden. In this case PCI Vault staff will be notified and contact you to resolve the issue. - If the request is not a
POSTrequest, please return405 Method Not Allowed.